Showing posts with label tips and tricks. Show all posts

Sometimes you may face“This Copy of Windows is not genuine” error when you install windows 7 on your PC. This error comes because, you may installed cracked version of windows 7 in your pc. Or it’s maybe because your Windows 7 License is expired. So in this post, i will tell you solution for how to fix windows 7 not Genuine error in build 7600 / 7601 or in any other Build. If this error coming on your pc, then you will see this copy of windows is not genuine error, & your screen background will go to black.

In This post, you will get solution for This window is not genuine error in Windows PC. As you know, real Window’s Price is too high. Everyone can’t buy Windows for PC. So if you have installed, Windows 7 in your pc, then it will give you 30 day time to activate windows 7 via key. if you don’t add windows serial key within 30 days, then you will definitely see this error.

This copy of Windows is not genuine
We highly recommend to your that Read this guide for educational purposes only. Please don’t misuse of this Guide.

We have added best method for fixing This error. This will take only 10 seconds to fixing up this error. Checkout that method from below. you just have to run one Command via Command Prompt in your Pc. it will fix your issue like Magic.

Check that out now from below:

Problems you May Face While Windows 7 Not Genuine Error
You Will Not able to Choose

Background Wallpapers Anymore.
Every time, when you will start pc, you will see this error, which is very irritating.

Your PC Performance will reduce, & Some Windows Services will stop working.
& Some other issues.

Disclaimer – We Don’t Suggest you to Use Free Version of Windows PC. Always Use Original Version of Windows & Developers Deserves It.

How To Fix ” This copy of Windows is not genuine” Error

If you are facing this This Window is Not genuine error in your Pc. then You can follow below methods & fix it. So here are the few steps, which you can follow for fix up windows 7 genuine error in your PC.

At First, Press Windows Key from your PC & Type – cmd In it & right Click on it, Select Run as Administrator.


Now, It will open Command Prompt in your PC, Just type SLMGR -REARM in it & Press Enter Button.
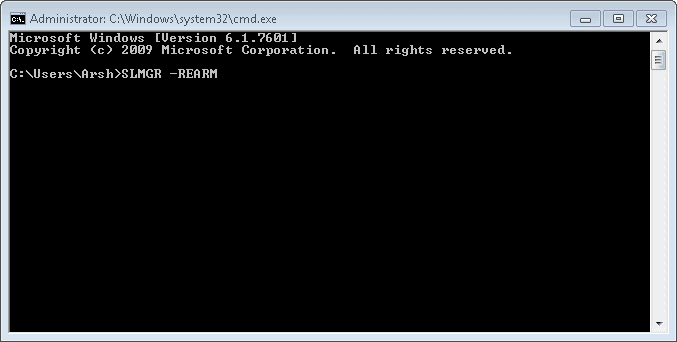

Now, Just wait for 10 Seconds. It will show you a success message, just like screenshot below. Now, Just Restart your Pc normally. you will no longer See Windows is Not Genuine error in your Pc.

windows 7 genuine error fix solution

Also there are some other Methods, which you will find on other blogs, like using Keygen etc. but that methods are not so Good & easy. This is the easiest method ever to Fix this windows is not genuine error. So now, you know how to fix This copy of Windows is not Genuine error. Always, while buying New pc, or if you repair your windows pc & installed fresh windows 7 in it. Then you may face this error. This is very common error, which anyone can face in PC.

If your problem solved from this post, then please share this post on Social Media. This will help us a Lot. Thanks for visiting & keep visit here for get more cool stuffs like this ! So This was the best new method, for fixing This Copy of Windows is not Genuine error.

Missing tricks


Trick on how to convert Oxigen wallet balance to Freecharge Credits.

You cant convert oxigen wallet promotional offer balance to bank. So by this trick you can transfer Oxigen wallet Money to  freecharge credit.

How To Convert Oxigen wallet Balance to Freecharge Credits:

Goto Freecharge Website here

Login your FreeCharge account.

Enter your phone number and select wrong operator and wrong area.

(Example:- Your Phone number is of Airtel select Vodafone and area is of Delhi select Haryana or any other )

Now Click to proceed.

Pay via Oxigen wallet.

Recharge will get failed and within 1-2 minutes you will get refund as Freecharge Credit in your Freecharge Account.

Facebook is most popular social networking site in these days. Most bloggers use it for their site links sharing, so i will show you facebook multiple group poster trick for posting in all facebook groups with just one click without any type of scripts. In most of blogs you will get trick to post in all facebook groups with a script, but i am sharing a trick to post in facebook multiple groups without any scripts.

Benefits Of This Trick

No Script

No Risk of Facebook Id Ban

Fastest Way

Instant Posting

Steps For Post/Share In All Facebook Groups Without Script

At First you need to add share it widget in your blog/site, For add share it widget open this link

Now Select Your Website Type and add setup widget in your blog/site after blogger posts

In Widget Customization make sure you added send button

After Setup This Widget Open Your Blog/Site’s any post and click On send Button

Now Enter Your Message And Click On Send

Your Message Now sent on groups which you selected in above step

PepperTap – your on-demand grocery app brings you the power and convenience of ordering groceries and fruits & vegetables in your hands. A few taps on the phone and within 2 hours, or at your chosen time slot, you will see the products knocking at your door!

Steps To Get Rs 250 Cash Back On Order Via PepperTap App:

here is little tweak with peppertap app .By ordering Britannia bourbon biscuit You will get your paytm cash back in your wallet.You thinking How then i am telling you how every Britannia bourbon biscuit pack you will get Rs 20 paytm wallet cash code inside the pack Now buy 10 pack worth of Rs 260 and apply our Rs 100 peppertap code in the app and pay rest of the amount i.e Rs 160 via Paytm wallet or Cash.When Burbon Biscuit deliver open the pack apply code in your paytm wallet to get cash by doing This You get Rs 250 paytm cash plus Biscuit also.Read below steps how to order.

How To Get This Offer :

1. Download PepperTap app
2. Now Select your City and locality and SignUp with your Mobile number,
3. Now in PepperTap app search for BOURBON,
4. Now Select Britannia bourbon biscuit,
5. Now add 10 Quantity of the biscuit and proceed to checkout
6. Now enter your name, email address and your delivery address,
7. On final payment page enter coupon code- GIOXI
(Use this code to get RS.100 instant discount)
8. Now select payment method (COD or Paytm wallet) and complete your order)

Now Goto paytm and login/SignUp to your paytm account then goto this Link and apply Promocode you got inside the pack of biscuit, apply all code one by one to get Paytm cash. Each pack of biscuit have only one coupon and you can use that to get Free RS.26 Paytm cash.

Terms and Conditions :

1. You can use maximum 6 coupons in each paytm account,
2. PepperTap coupon valid for new user only.

Currently available in Delhi NCR, Pune, Mumbai, Hyderabad, Bangalore, Ghaziabad, Faridabad, Chandigarh, Ahmedabad, Visakhapatnam, Surat, Vadodara, Mysore, Nagpur, Jaipur, Agra, Jodhpur, Ludhiana, Amritsar, Indore, Meerut, Jammu, Rajkot, Ambala, Jalandhar, Kanpur, Lucknow, Kolkata, and Chennai. More cities coming soon.

Peppertap Refferal trick:

To get ur own refferal code justselect ur home address to Chandan Nagar,pune …….and save it and restart peppertap and u will get ur own link.

Grab it fast, 100% working

Edit: It will work only if you ordered your 1st order from it., and code will disapear when you change the address so note down your code and earn

Edit2: thanks to one of the friend ****** , on fb, he own this trick I just shared trick, all credit goes to him

Source : Txtme

Google+ is one of the fastest growing Social Networks and is considered the best network for content marketers

so, in this post I have come up with yet another simple trick to gain Free Google+ Real Followers.

Trick to get FREE Unlimited Google+ Followers:

So, without wasting time lets get started. This trick can get you around 100-1000 followers daily. Note that the followers are 100% real people, no bots and they follow you manually. I’ve shared 2 different methods to get followers. Try them both and do share your experiences in the comments section.

Follow Others to get Followed

Followers Trick 1-

Steps to Follow

This trick is very easy to apply and takes no more than 5 minutes to get everything done.

Open up Google+. Make sure there are no restrictions on your profile.
Search for #SharedCircles.  The results will come up with a long list of various Google+ Circles shared publicly.

Here comes the tricky part.

All you have to do is just, select any circle with around 200+ members and click on ADD people button. (You can also read the circle description to know more about it).

You can create a new circle or add them to any of your exisiting circles. I recommend making a new circle everytime.

After you create the circle, you will start getting followers. Here’s a snap showing my 1 day Google+ Notifications. 80% of the notifications I get are of followers.

Additional Tips

You can add only 1 circle a day. Adding more may lead to temporary restrictions on your profile
Apply this Trick on alternative days.
You can also search for keywords like:

#CircleOfTheDay
#SharedPublicCircles
#SharedCircle
#PublicCircle

Followers Trick 2- Steps to Follow

The main advantage of this trick is that it gives you targetted followers. All you have to do is just some 10-15 minutes research.

Go to CircleCount and click on Specials<< Circles, you will find 4 different options.

Here are the links:

Curated

Recent

Engaging

Alltime

Open up any link, a list of some of the best Circles will be displayed. Different stats of the circles like Followers, +1s, Comments, Reshares are also displayed.

Enter your Keyword in the Search Bar and get a list of Circles related to your search. This way you can find circles related to your niche.

You can also view different stats of a Circle by clicking Details button.

Select any Circle of your niche having huge engagement and add the circle following the steps explained in Trick 1.

So to conclude, Find Active Circles related to your niche and Add them using the steps given above. You will then get followed back by around 50% members of that particular circle.

Advantages of these Tricks

There are a lot of advantages of using this trick, let me list some of them:

Having more Followers will make your profile look more professional
You will start getting Shares on your posts
It will boost your visibility on Google+
It will help you get more plus ones.
Get Great content in your Streams.
I hope you all enjoyed this trick of mine. Do share it with your friends and other bloggers. If you are getting confused, do let us know in the comments. We will try to solve your queries.


The world suddenly freezes when you see your phone falling straight into water. Whether it’s a pool or a toilet, you just know nothing good will come out of the next few seconds.

After all, that’s a high tech device that’s likely worth multiple hundred dollars, and chances are very high that it will be deemed unusable. That is, unless you have one of those awesome waterproof smartphones. But most of us don’t, so we have to resort to other methods.

Let’s start by telling you that saving a water-damaged phone is pretty much a coin flip. Nothing can guarantee the device will actually be rescued. And if the gadget has already been harmed, there are high chances that damage is permanent. Regardless, often times the stars align and you end up saving that precious technology that holds all your important data and connects you to the world.

With the help of the following tips, we aim to increase the probability of your phone making it through such disaster. So let’s dig in.

Take it out of the water and make sure it’s off!

I know it’s hard to react quickly when such a devastating event takes place, but you must snap out of it! The longer your device stays underwater, the lower its chances of survival are. You must dig in there and take that phone out of the water right away. Yes… even if it’s in the toilet!

Once the phone is out of the water, make sure it’s off and stays that way. Even if it seems fine… it is important to shut it off just in case. If the phone is still on, just shut it down or take the battery out if you can. Then put it in a safe place, preferably on a flat surface over some paper towels.

What not to do

The following actions can mean the difference between a totaled phone or a survival story. You better be careful what you do. Before we jump into finding a solution, let’s try to prevent major failures you could cause.

Do not turn on the phone, as we already mentioned. Electrical components don’t play well with water when operating.

Don’t plug it in either! For the same reason.

Don’t press any keys. This can push water further into the phone. It’s best to try to mess with the phone as little as possible.

Don’t shake or blow into the device. This could also push water into deeper areas of the phone.

Especially try to avoid blow driers – not only because of the blowing part, but also because of the following point.

Do not apply any heat to the phone. Remember excessive heat can also damage the phone. You don’t want to add more damage!

Don’t move the phone around too much. Same deal; you don’t want the water moving around inside the phone.

Disassemble the phone
And don’t mistake this step with “take the whole darn phone apart”! What I mean is that you should remove everything that is user-removable. If you back cover is removable, take it off.

Similarly, try to remove the battery (if you can), SIM card and SD card. Lay it all out in the paper towel.

Now, if you are an experienced tech specialist of sorts and know the ins and outs of a phone, and don’t mind risking voiding your warranty, you can go ahead and take the whole phone apart too. It might help with drying up every single piece faster.

Try to dry the exterior with a paper towel

We first have to try to get rid of all the excess water found in the exterior of your phone. Use the paper towel to dry out every component. Just make sure you don’t mess with the phone too much. Gently dry everything out without moving things around too much.

You could try a vacuum cleaner
Of course, there are areas the paper towel can’t access. And while we told you not to blow anything into the phone, we didn’t tell you not to suction the water out. In fact, a vacuum cleaner can suck off bits of water from the phone without too much risk. Just make sure the suctioning doesn’t make the phone move around excessively.

Time to dry it out

The hardest part is coming, because it involves leaving the phone untouched for an extended period of time. This means you can’t use your smartphone! If you have another phone you can borrow, just make sure the SIM card is completely dried out and stick it into the working handset. Otherwise, just resort to smoke signals, public phones and all that archaic stuff.

So how do you dry your phone out?

You could just leave the phone on top of the counter or inside a drawer, but some people like giving it a little help. The idea is to put it in an environment that will ease its drying process. A very common practice is to put the phone in a Ziploc bag full of rice and let it rest there for about 2-3 days.

But why rice? Mostly because it is something readily available at most homes. The idea is that rice is very good at absorbing humidity in the air, making the phone’s environment drier and hence helping dry out the device. But there are alternatives that could be better.

Among better options are silica gel packs, which are those little packets you often find in shoes or electronics boxes (and you can’t eat). It’s not like all of us have these laying around, though, but if you think ahead of time you, could get good deals on Amazon.


And while we are on the whole thinking ahead topic – you could also buy a water rescue kit.

The moment of truth

So you did everything you could and a few days have passed by. It’s time to see if all your efforts paid off. Take the phone out of wherever you left it and put it all together. Then plug the phone in and try to turn it on. If it works, you have succeeded! Stay on the lookout for any odd behavior, though. At least for a few days. Something may still happen. Also, test all the components. Make a call to see if the microphone and earphone work, test the speaker, etc.

Now, if the phone doesn’t work, it’s time to accept defeat and take it to a professional and see if it can be salvaged. You can also claim insurance if you have it.

Conclusion

Not to sound like a doctor, but after this point we have really done everything we could. Sometimes you just have to let the phone go, guys. Hopefully most of you get it back up and working, though!

Hit the comments and tell us your experiences! Have any of you tried these methods? What other tips do you have for your fellow phone dunkers? Hit the comments...

Source : Androidauthority

An Android user who hasn't experienced the Google Play Store crashing and burning is a rare species indeed. Whether the problem is a error message when downloading apps, or that the Play Store simply won't open, we have the solutions. Here's what you can do when the Google Play Store doesn't work for you.


First, we recommend taking a look at our article that explains what the various Play Store error messages mean. Then try our tips below.


1. Clear the Google Play Store cache

In most cases, you can stop the Play Store faltering just by emptying the app's cache. The cache is a storage area that temporarily holds data so it can be quickly retrieved without needing to be reloaded. To empty the cache:
Go to Settings > Apps. Tap All > Google Play Store then finally tap the Clear Cache button.


2. Clear out your Play Store data

Deleting your data from the Play Store works along the same lines as our first tip, but is more drastic. It sets the app back to square one and gets rid of your saved information, hopefully including whatever glitchy data was causing the problem.
As with the previous tip, go to Settings > Apps > Google Play Store, but this time tap Clear Data.


3. Uninstall Play Store updates


Sometimes an update to your Play Store app will do more harm than good. If you think that's the case, it makes sense to uninstall that update.
Go to Settings > Apps > Google Play Store, then tap the button that says Uninstall Updates.This will revert Google Play back to the original version (as it appeared when it was first installed on your device),

Next, you'll need to find an older – but still recent – version of the Play Store app to download. The best way to do this is by going to the Google Play Store page on APK Mirror and download it from there.


4. Clear data and cache on Google Play Services


If Google Play Store is the beating heart of your Android device, then Google Play Services is its soul. Play Services is the enigmatic background process that brings the scattered pieces together and makes them greater than the sum of their parts. In other words, it allows apps to communicate with different parts of your device, enabling them to sync, send push notifications and so on. It is possible that Play Store problems could stem from issues with Google Play Services.To solve them:


Go to Settings > Apps > All > Google Play services then tap the Clear Cache button. If that fails to solve the problem, come back to this page and tap the Clear Data button.


5. Install the latest version of Google Play Services


Another thing that may help is to download and install the latest version of Google Play Services. The most current version of the software is likely to be the most stable, so it's useful to keep it updated.


6. Reset your Google account on your phone


We're coming now to the slightly more drastic solutions. If your Play Store app still isn't working, then you may need to refresh your Google account on your Android device. To do this, remove your account then add it again.


  • Go to Settings > Accounts then tap 'Google' under manage accounts.
  • Tap the Google account you want to remove, then tap the menu icon (three dots) at the top right and tap 'Remove'. Do this for every Google account on your device.
  • Next, go to Settings > Accounts > Add Account > Google and follow the on-screen steps to re-add your account.

7. Enable download manager


There is a chance that the Play Store will stop working if your download manager is disabled. If this is the case, the solution is simple.


  • Go to Settings > Apps / Application Manager > All > Download Manager.
  • If Download Manager is disabled, you'll see a button marked 'Enable'. Simply tap this button to switch Download Manager back on. If all you see are buttons for 'Force Stop' and 'Disable' (possibly grayed-out, as seen below), then Download Manager is not disabled and you can rule this possibility out.


8. Perform a factory data reset on your smartphone


If you're still facing problems after having tried all of the above, then you may have little choice but to do a factory reset. Be warned that all of your data will be lost, so perform a complete backup beforehand. To do this:


  • Go to Settings > Backup and reset, then make sure the 'Back up my data' slider is on. Tap 'Back up account' to select which account you want your data backed up to.
  • Once you've done this, go to the Backup & reset menu and tap the 'Factory data reset' button at the bottom.
  •  Confirm that you want to do this, and you phone will be as good as new. Your backed up data will be restored when you log back into your Google account.

9. For rooted users: edit hosts file


If the Play Store won't load for you and your device is rooted, you have an even simpler solution on your hansd: just modify your Hosts file for a quick fix.


  • Go to your preferred file manager, then navigate to system/etc/hosts and select the Edit option (this will vary between devices).
  • Add a hashtag (#) to the front of the second set of numbers and save your changes (i.e. change from 127.0.0.1 to #127.0.0.1). Reboot your device, re-add your Google account and your Google Play Store problems should be fixed.


Did these solutions work for you? Do you have any other advice to get the Google Play Store working again?

Let us know in the comments.


Source :Androidpit

Just follow below steps to get unlimited freecharge 50 cashback on 50 codes...

How to get unlimited freecharge cashback codes from firstcry

1) Firstly click on below link

http://marketing.firstcry.com/Email/ShowMail.aspx?GMID=86&GMSID=41000

2) On the link you will see GMID=86
Just remove 86 by any number and Hit Enter. that’s it you will get the Rs 50 Cashback Coupon.

3) Everytime whenever you will change it and refresh you will get new freecharge 50 cashback on 50 codes.

( Do above steps again and again to get unlimited freecharge 50 cashback on 50 codes )

How to Redeem:

1) Log on www.freecharge.com or Download FreeChargeApp

2)Choose Prepaid Mobile/ Postpaid Mobile /DTH / Datacard / Utility
3) Enter number, Amount & Click to Proceed

4)Pick equal value coupons for the transaction amount equivalent (optional)

5)If an existing user at FreeCharge, LOGIN with details, if new user Sign Up

6)Enter Promo Code & Click Redeem Now to CONTINUE

7)Balance amount if any, Pay online (via Debit Card / Credit Card / Net banking / Cash Card / ATM Card)

8)That’s it. Successful transaction is done!

9)If opted for Value coupons, will be delivered to your inbox instantly via email once the transaction is successful.

Terms & Conditions:

1)Recharge for Rs.50 and Get Cash Back of Rs.50 (Pre-Paid / Post-Paid Bills / Utility Bills / DTH / Data Card)

2)Validity – 30-Sep-15 to 31-Oct-15

3)Offer not valid on Airtel (Pre-Paid / Post-Paid / DTH)

4)Offer is valid for transactions made at www.freecharge.com or Download FreeChargeApp Android | iOS | Windows)

5)Cash back will be credited within 24 hours of the transaction into the user’s account and Cash Back will be valid for 6 months from the time cash back hits in the users account

6) One code to be redeemed against one transaction only

7)Unique Promocode has to be applied to avail cashback offer. Valid only once per Unique Mobile Number/User/Credit/Debit Card

8)Valid only for successful transactions made through Debit/Credit card

9)Offer is not valid on ‘Add Cash’ transactions, Net Banking transaction & using FreeCharge credits

10) FreeCharge holds the right to refuse transactions deemed fraudulent as per FreeCharge policies

Ditto TV is an entertainment revolution that delivers Live TV, Video-on-Demand, Music, News and much more on your mobile phones, tablet, desktops, laptops and other hand held devices. Ditto TV empowers you with instant access to live breaking news, live sports, live daily soaps, top TV shows, music videos and your favorite blockbuster movies on the go.

Ditto TV's revolutionary technology ensures quality viewing that is adapted to suit a range of internet speeds to deliver an optimized video-viewing experience.

Ditto TV is another platform first from Zee Entertainment Enterprises Limited (ZEE), one of India's leading television, media and entertainment companies.

How To Get 1Year Subscription :
(this trick only for rooted mo users)

Step 1 :

1) Download first Ditto Tv App
2) Open app and register new ac
3) After sucessfull signup close ditto tv

Step 2 :

1) Download Lucky Pather app
2) Open and long press on ditto tv

3) click on support patch for in app and LvL
4) and Click On Apply

Step 3 :

1) again open ditto tv app
2) click on subscription plans
3) Select one year plan
4) and pay using google wallet
5) Luck patcher is automatic open

6) In App Purchese Hack Click on YES
7) NOW U GET 1YEAR FREE SUBSCRIPTION

[Sponsored Post: Androidhacks]

Facebook is the No.1 & most powerful Social media platform for bloggers, advertisers, internet marketers, brand to promote their business. Once you publish an article on your blog/website, you need to share it among the big amount of audience to get traffic.
If you don’t expose your latest post on Social media then How others will come to know about your post. Facebook Groups are the first and best way to expose your new post. As Facebook has the huge amount of users, you can drive good amount of traffic to your blog by Sharing your Post into the Facebook Groups.
If you a Blogger Then maybe you have joined lots of Blogging Facebook Groups even i too.
But, if you share your posts in all Facebook Groups manually then It will eat a lot of valuable time.
Today, I’m going to Share my personal method to Post in Multiple Facebook Groups at Once.
The interesting point of this Facebook Auto Poster Trick is that you do not need of any Auto Poster Script or Websites, It’s totally official and free.


How to Auto Share your Post in Multiple Facebook Groups:


There are two process you have to follow for Posting in all Facebook groups without Script.

Collecting Email Addresses of Fb Groups:
This step is not easy but also not difficult. It is a little bit time-consuming but the one-time process.


Posting into Multiple FB Groups:
This process you need to follow whenever you want to share your posts in these groups.

To Collect Email Address of Fb Groups:

  • At first, you need to have a list of Username of all Facebook Groups where you want to share your post.
  • Open any Group in your browser and collect the Username from their URL. Like for my blog...the Facebook Group URL is https://www.facebook.com/groups/sillyoffers         
          Then your need to collect Username which is “sillyoffers“.
  • Join lots of Facebook Groups of your niche and paste all the Username of all the Facebook Groups (where you want to post) into Notepad or any text editor.
  • Once you made a list of Username, you have to create Email Address of those groups from their username, don’t worry it’s too easy.
  • Just add @groups.facebook.co after username which will look like below e-mail.

         Username@groups.facebook.com


  • Now you have the list of Email Address of that Fb Groups, just separate it with comma (,)

Trick to Post into Multiple Facebook Groups:


  • Login to your Email/Gmail which you have used to create your Facebook account or which is currently set as Primary Email in your FB Account.
  • After that, click on Compose mail option.
  • In BCC field, paste all email addresses which you have collected in above steps.
  • Now enter your mail/post with text, links etc whatever you want to post into those Groups and finally click on Send button.
  • You’re done.Now go to any of that Facebook Group, you will see your post has been successfully posted there.


Alternatively, you may also use Auto Poster Script Code which allow you to Publish your post in all Facebook Groups. But, I recommend not to use them because of some security issues,  you may get red-flagged or banned for sometimes for using that script and then you can’t post anythings in any group in banned period.
You can also call this as
“Official Way to Share Post in Multiple Facebook Groups in One Click” without any Script Code Just Using Gmail.
Hope you liked it. Share your feedback and questions in comments.
Many times, we need to use WhatsApp for sending or receiving messages/media without showing or using our real mobile number or even trick our friends and message without revealing our Identity. Now, by using the following tutorial you will be able to create a fake WhatsApp account with a spoofed U.S.A number in any country, that too will all the normal functioning of WhatsApp . The tutorial will work for Android, and iOS devices (iPhone) too!


Tutorial to create a Fake WhatsApp account with other Spoof Number:


  • First of all , Install and verify WhatsApp on your phone .

         (Skip this step if you have WhatsApp already installed & verified on your phone).
  • Now, Install Vovox app for Android or iOS and complete the verification on Vovox app
  • After verifying your Vovox navigate to more tab in the app
  • Now,  Note down your Vovox Number (you can change it to any number you want to)
  • Now, Open WhatsApp app and navigate to the settings option
  • Once you are into the settings panel , Open the Change number option
  • Now, when you are into the Change Number Option inside WhatsApp app, Enter your existing Verified Mobile number in text field of “Old country code and mobile number” and in the second text field , Enter country code as “+1” which is U.S.A country code and type in your new phone number (Vovox Number)obtained in Step.3
  • Now, Click on “Done” option present in Whatsapp app’s top right hand side corner .
  • You’ll soon receive a message on your Vovox app with verification code, while at the same time WhatsApp app will be waiting for Verification.
  • Now, Open the message you received in Vovox app, and then Click/visit the Verification link received in the message

That’s it ! Your Whatsapp verification would be completed successfully! & you can now use WhatsApp with a fake/spoof U.S.A number and Enjoy WhatsApp Anonymously!
Google Play Store, or previously known as the Android Market, is the official app store for Android device that contains both free and paid applications. If you have linked up your credit card or Google Wallet to your Google play then you can easily purchase apps or in-app purchases within no time. But this might be a downside if your children gets hang of your phone and purchases any applications without your knowledge.


Fortunately, Google has a hidden setting to enable password protection and prevent accidental or unwanted purchases from the Google Play Store.
Previously, the app could only be set to require the password after a 30-minute window expired.

Google has pushed out an update to the Play Store that prompts for a password every time a purchase or in-app purchase is made.


So here is how to configure the new feature. Please note that you need to have Google Play Store version 4.6.16 or above for that. If you do not have it yet, you can update it by tapping the Build version in the app’s Settings.


  • Open the Play Store app.
  • Tap the Play Store icon ; Settings.
  • Under “User controls” section, you’ll find the “require password for purchases” option which is set to 30 minutes by default.
  • Tap on the option, and select “For all purchases through Google Play on this device”.
  • Enter your password when prompted

 That’s it...!!!
 Now, whenever anyone tries to purchase an app, book or movie from your Google Play Store, they’ll  need to enter this password. This also includes in-app purchases as well.

If you want to turn off password protection on your device, just follow the same steps above but this time choose ‘Never’ in the “require password for purchases” option.


Keep visitig us for free recharge offers and tricks...
If you are using android smartphone then you will suffer from many play store errors and most common error is play store error 941. this error comes due to some issues.


so,how to fix this play store error


Steps For fix play store error 941


At the First Open Your Phone settings


Now Click On Apps – All – Play Store
After That Tap On Clear Data Button
Like below screen shot:


Now try to download apps, you will not get Play Store error 941 again


If You are still getting this error then tap On Uninstall Updates Button.


You are successfully fixed this error.

As you all know that Freecharge has come up with an awesome feature which is Freecharge Wallet and now one more good news that you can transfer your SD Cash into your freecharge wallet easily. Still freecharge is working on Wallet system. You can use your freecharge wallet money for recharging your mobile or dth.


Trick To Convert SD Cash Into Freecharge Credits:

At first visit Snapdeal

Click on My Account section and Login to your Snapdeal account.

Then upgrade your snapdeal account by verifying your mobile number by otp. [must enter that number which is registered with your Freecharge Account]

Now order any product on snapdeal using your SD Cash.

After placing the successful order go to 'My Order' and cancel the product which you purchased earlier.

That's it, Now You will get your Refund in FreeCharge wallet (SD Cash) and amount which has been paid online - if any (It will be transfered back to your bank account).

NOTE: You cannot transfer this Money into your bank as it is a Merchant promotional money but you can make recharges / bill payments from it. Further sit back as #FreeChargeWallet is coming soon with exciting offers.

Freecharge:

India’s no.1 online recharge app for Prepaid mobile recharges, Postpaid bill payments, DTH recharges and Datacard recharges.
Recharge or pay your bills in under 10 seconds. Fast. Safe. Secure.
Freecharge also introduced one more feature to transfer freecharge credits to Bank Account.

Steps to Avail Offer :

GoTo FreeCharge Website

Login your FreeCharge account.

After Login they ask you To Upgrade your Account and Enter your Mobile Number & Verify with OTP ( One Time Password ).

After Verify Click on “Add Money to FreeCharge balance“.

Your Old FreeCharge Credits will  Transfer to Your FreeCharge Balance instantly.

Now Goto Wallet to Bank Transfer Page
Click on “Menu”  » “Banks” » Enter your Bank account number, IFSC code, Payee Name, Bank Name.

Now Goto “Menu” » “Cash” » Click on “Withdrawn Money To Bank”

Now Select your Bank account and Generate OTP and verify your Number with OTP and Click on “Submit“.

Done, Your FreeCharge balance will get Credited to your Bank account by FreeCharge instantly without any Charges.

Note:

Minimum you can Transfer Rs.50 & Maximum Rs.5000 In a single Transcation.Monthly Limit is Rs.25000

⇒ You Can Also Use Frecharge Wallet Balance to shop at SnapDeal

Now you can buy Google play vouchers from snapdeal…

How to get:

1:- Go to offer page

2:- select voucher

3:- add to cart

4:- login/register

5:- make payment

Done!!!!!

enjoy... Keep visiting

As all you know that now a Days hike providing 50 MB data for per referral so someone has its own WiFi and want to convert that data into talktime this trick is better for those...

Steps To Follow :

1. Download Hike Messenger.

Skip above step if you are already using Hike Messenger App.

2. Now you have to collect some data rewards by referring your friends, if you already earned data then go for recharge as

3. Goto Rewards  and select Data Rewards then click on Get Data Pack.

4. Now on next page, select wrong operator or state details.

5. Finally select pack and processed to recharge.

6. As you entered wrong details, so wrong detail Recharge Unsuccessful error shows

7. Once your data pack recharge got failed, you can see recharge your mobile section.

8. Finally select Recharge now and enjoy Talktime balance instead of Data balance

→ Google has recently launched a new search keyword that offers us addictive knowledge ,this is similar to the once we used earlier like define word,time in india etc,The ‘fun fact’ keyword provides,us informative facts from various areas,This will help us boosting the trivia knowledge along with entertainment,once you perform this search google displays random facts,click ask another question to view more facts.


→ So next time when you are Bored at School,office or work,Just google Fun fact or I’m Feeling Curious


→ This feature by google aims to keep us entertained and amazed,once you perform this search ,it shows up a question on the top,which is answered in the following paragraph,Clicking on the ‘Ask another question’ will generate another fact,and if you keep clicking ‘Ask another question’ this will create an endless sequence of random facts.


→ The facts will appear in English,each of the fact is pulled out from other sites,google also provides a link to the site from where the answer is referred to,you can click on the link to view the source,and gain more knowledge regarding the fact,this will work only with google on desktop,mobile users can’t test it,now just head to google and start exploring the facts.

a trick through which you can use your Paytm Wallet Money or Mobikwik Wallet money on Snapdeal.com . Officially they dont have this option to use Paytm/Mobikwik wallet but by this awesome trick you can easily use it. This is safe and by doing this you can place any orders using Paytm/Mobikwik wallet at Snapdeal. So lets grab this awesome trick.


Steps to Use Paytm/Mobikwik Wallet on Snapdeal Shopping

First of all install Snapdeal App from playstore.

Now open Snapdeal app and Login or Signup into your account and search the product you want to buy.

Add the Product to Cart and Enter all Delivery address.

Now at the Payment Steps Choose “Debit Cards”

Now Dont select Visa/MasterCard/Maestro Cards. Click on Other Banks and select “Punjab National Bank Debit Card“

Now it will go to punjab banks page. Now scroll down you will get a option of “Wallet”

Now a pop up with Three Wallets will Come Choose any of them according to your Convenience.

Now click on Proceed and you will be redirected to Paytm/Mobikwik Payment page.

Login into your Paytm/Mobikwik Wallet and hit on Pay.

BOOM!!!! You have Successfully Shopped at Snapdeal.com Using Your Paytm/Mobikwik Wallet.

Note : If you want to pay through Oxigen wallet then select “Cash Card” option instead of “Wallet”

From this trick you can easily transact at Snapdeal.com with your Paytm/Mobikwik Wallet. This trick is 100% working